


The Concept >
ReactJS is an open-source, component-based front-end library responsible only for the view layer of the application.
It is maintained by Facebook.
A React application is made up of multiple components, each responsible for outputting a small, reusable piece of HTML. Components can be nested within other components to allow complex applications to be built out of simple building blocks.
React allows us to write components using a domain-specific language called JSX. JSX allows us to write our components using HTML, whilst mixing in JavaScript events.
JSX ??
Almost all React code is written in JSX. JSX is a syntax extension of Javascript that allows us to write HTML-like syntax in Javascript.
React will internally convert this into a virtual DOM and ultimately output our HTML for us.
Installation and Setup >
Installing via npm :
npm install -g create-react-app
Some context.....
NPM - Stands for "Node Package Manager." It's like an online store for code libraries and tools that developers can use to add extra features or functionality to their React.js projects.
Creating your first React App >
create-react-app reactproject
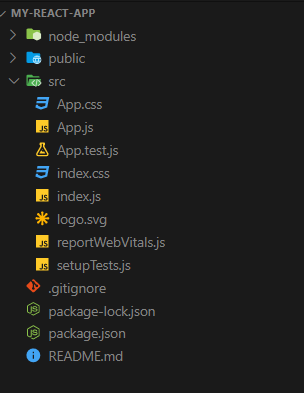
👆🏻 This is the basic structure of a React Project
The App Structure >
Let's get to know everything about the project structure >
src Folder: This is where most of your application code resides. It contains the source code of your React components, styles, and other assets.
index.js: This is the entry point of your application. It renders your root React component into the DOM and sets up any necessary configurations.
App.js: This is often the main component of your application. It can contain your application's routing setup and layout structure.
Components Folder: Organize your React components into subfolders within the
srcdirectory. You might have folders for components likeHeader,Footer,Sidebar, etc. Each component should have its own directory with its JavaScript file (e.g.,Header.js) and a CSS file if needed (e.g.,Header.css).Containers Folder: Some components may act as containers that connect to your application's state (using Redux or React Context) and provide data to other presentational components. Organize these containers separately.
Styles Folder: Store your global styles, variables, or utility classes in a
stylesfolder.Assets Folder: Place static assets such as images, fonts, and icons in an
assetsfolder. This keeps them separate from your source code.
public Folder: This folder contains files that are publicly accessible. Common files include:
index.html: The HTML template for your application. This is where you include your root DOM element (usually a
<div>) and other meta information.favicon.ico: The icon that appears in the browser's tab.
static: A directory where you can place additional static assets that aren't processed by your build tools.
config Folder (optional): If you need to configure any environment-specific settings or constants, you can create a
configfolder. This might include API URLs, authentication tokens, or other configurations.redux Folder (optional): If you're using Redux for state management, you can organize your Redux-related code in a separate folder. Common subfolders include
actions,reducers, andmiddleware.routes Folder (optional): If you're using a routing library like React Router, you might create a folder to define and configure your application's routes.
utils Folder (optional): Store utility functions or helper modules that are used throughout your application.
tests Folder (optional): If you're writing tests for your application, place them in a separate folder. You might use libraries like Jest and React Testing Library for testing.
node_modules: This folder is created when you install dependencies using npm or Yarn ( another way to make an app ). It contains all the third-party libraries and packages your project depends on.
package.json: This file lists the project's dependencies, scripts, and other metadata. It's also used for managing and installing packages.
webpack or Babel Configuration: Depending on your project setup, you might have configuration files like
webpack.config.jsor.babelrcat the root level to customize your build process..gitignore: This file specifies which files and folders should be ignored by version control (e.g., node_modules, build artifacts, editor-specific files).
README.md: A README file with information about your project, including installation instructions, usage guidelines, and other documentation.
Starting the server >
Now that you've successfully built your first React app, it's time to bring it to life!
To get started, let's run these essential commands.
$ cd Desktop
$ npm start
NPM will start the server and access the application at the default server http://localhost:3000.
Now, we will get the following screen.

Ending and Valuable note >
Congratulations on creating your very first app!
But remember, this is just the start of an exciting journey.
This post is the first post of my "React 101" series consisting of 7 posts.
There will be more new series in the future...based on the advanced concepts of React JS.
Hope you have tried out making your own cool react app and explored it by yourself.
I hope this post has been helpful. If you have any questions, please feel free to leave a comment below.
Happy Coding !
Thank You